NOTE: This is an UPDATED version of this post following about 10 cartridge installations and countless hours of listening and making system improvements over the past 5 years.
Based on the experiences I’ve had since doing my first install, I’ve gone back and revised this post to make it clearer and more specific to the needs of a newbie installing a cartridge for just the first or second time.
Soon I’ll be updating Part 2 of my Turntable Setup Guide, with an emphasis on how we can improve our setup beyond the basic task of just getting it up an running to play records. So stay tuned for the Part 2 update and more updates to follow.
In a previous post I admitted that in the past, when I’ve gotten my system sounding the way I want it to sound (or at least the way I think I want it to sound) I’m reluctant to fiddle with it, particularly turntable adjustments.
The problem with this way of thinking is that maybe it could sound even better. And if I don’t experiment, how do I really know if it’s dialed in as well as it can be? The answer is, of course, I don’t. But when my Benz cartridge imploded during a routine playback a few weeks ago I was forced to make the choice between spending a rather hefty sum of money that I didn’t really have to buy a new cartridge from my dealer, mainly to have access to his installation services, or spend significantly less money and do the installation myself. In the end, the cost savings won out.
Fortunately, there are a great number of resources out there to help analog audiophiles muddle through a cartridge installation. And despite the fact that I’d done this a grand total of “0” times and the pro’s at the shop where I do business have done it dozens of times, outside of the time and money I was saving by buying and installing my own cartridge, I was also gaining some invaluable experience that, unlike the cartridge, would last the rest of my life.
Once such resource was Tom Port at Better Records. I had read many of his posts on turntable set up, but in an email exchange he gave it to me straight:
“…no one can set up your table for you as well as you can do it yourself. It takes weeks to get it really dialed in right, and no one else has weeks but the owner of the table!
I made a huge leap forward in terms of my listening skills when I started messing with my Triplanar arm 20 years ago. Now I know how important it is to do the work myself.
I also have visited a number of audiophiles who had obvious set up problems but were afraid to mess with the arm and make it “worse.” This is insanity, but it is not unusual in the world of audio.
Do not rely on experts. Experts are the guys that tell you how great remastered records are. Or originals. Or you-name-it that’s clearly wrong.
My two cents: if you are serious about sound, you have to learn to do it yourself. Nobody can set up your speakers, how can they set up your table?
Changing the VTA for each record is the only way to get the best sound, how can they do that for you?
Anyway, that’s my take!”
I wasn’t sure I wanted to hear it, but I knew deep down Tom was right. If I was serious about sound, and I believed I was, then I needed to learn to set up this new cartridge on my own. When I finally accepted this it was like a heavy weight had been lifted off of my chest. I knew then that installing and setting up the Needle Clinic NC-1 cartridge I’d agreed to buy and audition was my chance to put the listening skills and high quality vinyl pressings I’d accumulated to the test.
How hard is it?
As it turned out, it was not as hard as I expected. But as much as some of the online info I found was helpful, in some instances, it only served to ratchet up my anxiety. An article entitled “A Beginner’s Guide to Cartridge Set Up” I found was initially helpful, but the final paragraph in an early section of the article on aligning the cartridge was far from encouraging.
“While it might, at some point into this process, seem that aligning what has now become known as ‘that freaking cartridge’ with ‘those freaking lines and points’ of ‘that freaking gauge’ is virtually impossible, take solace in the fact that you’re only a dozen or so hours away from playing a freaking record.”
I’m sure the author never intended this, but the paragraph above was my primary takeaway from the article. The author was essentially saying “prepare to get stressed out!” Another was his recommendation to buy and use the Hi Fi News and Record Review Test Record, particularly for adjusting azimuth. I will address azimuth as well as the other necessary adjustments later, but before I get to that I want to address this question of using a test record for turntable set up.
Test records
In addition to the aforementioned article, I read multiple forum threads on the subject of cartridge set up. Forum posters regularly refer to the test records they use to set up their turntables, but the consensus on forums is somewhat mixed on the subject of whether test records are necessary. Some people insist they are helpful, even essential, but these tend to be the same people who say “I don’t trust my ear so I need the test record to take the guesswork out of it.”
I can understand where this thought comes from. It’s that unfortunate place in the audiophile psyche that still doubts whether we can really hear all of the amazing things that modern audiophile systems can do when reproducing recorded music. It’s that place in the mind where we wonder whether we are hearing the things we are supposed to be hearing or whether we are, as a friend of mine and fellow audiophile put it, “just drinking the kool-aid.”
Every audiophile should find this place in their mind and permanently abandon it, roll a giant psychic bolder that requires the strength of 10 men in front of it, and then never re-enter. That is, if she or he want to truly enjoy the fruits of their audiophile labors.
Anyway, getting back to test records. Ultimately I landed on the belief that test records are not a good tool for installing a cartridge. The tests they have on them strike me as pretty useless for the most part, and you certainly don’t need a test record to get a basic cartridge install done and your turntable sounding very good.
Use a protractor
You will, however, need a protractor, preferably an arc protractor. There are many options for these that range from the highly functional WallyTractor to one that will get the job done that you can download for free. This free protractor is generated on the website based on the specs of your tonarm, so you’ll need to enter the pivot to spindle distance to get one.
You’ll also need to choose which type of overhang setting you want. Just scroll down from the top section where you’re asked to input the brand of turntable and tonearm you have for a detailed description on these different overhang settings. I chose Baerwald and got very good results.
Level your turntable
Before you install your cartridge, if you haven’t already done so, level your turntable. Or more specifically, level the platter. The small, circular “bullseye” levels that sometimes come with cartridges are not always the best ones to use, but they’re fine to start with. To increase accuracy, place it in multiple locations on the platter and keep adjusting the height of each foot of the table until it presents level at each of these locations.
You might also check your toolbox for a better level, or get one from the hardware store. Steel balls can also be helpful for double checking your work. If you set one on your platter and it quickly starts to roll off, you might want to spend a bit more time fiddling. In any case, get it as close as you can and then move on. You can always dial it in more later.
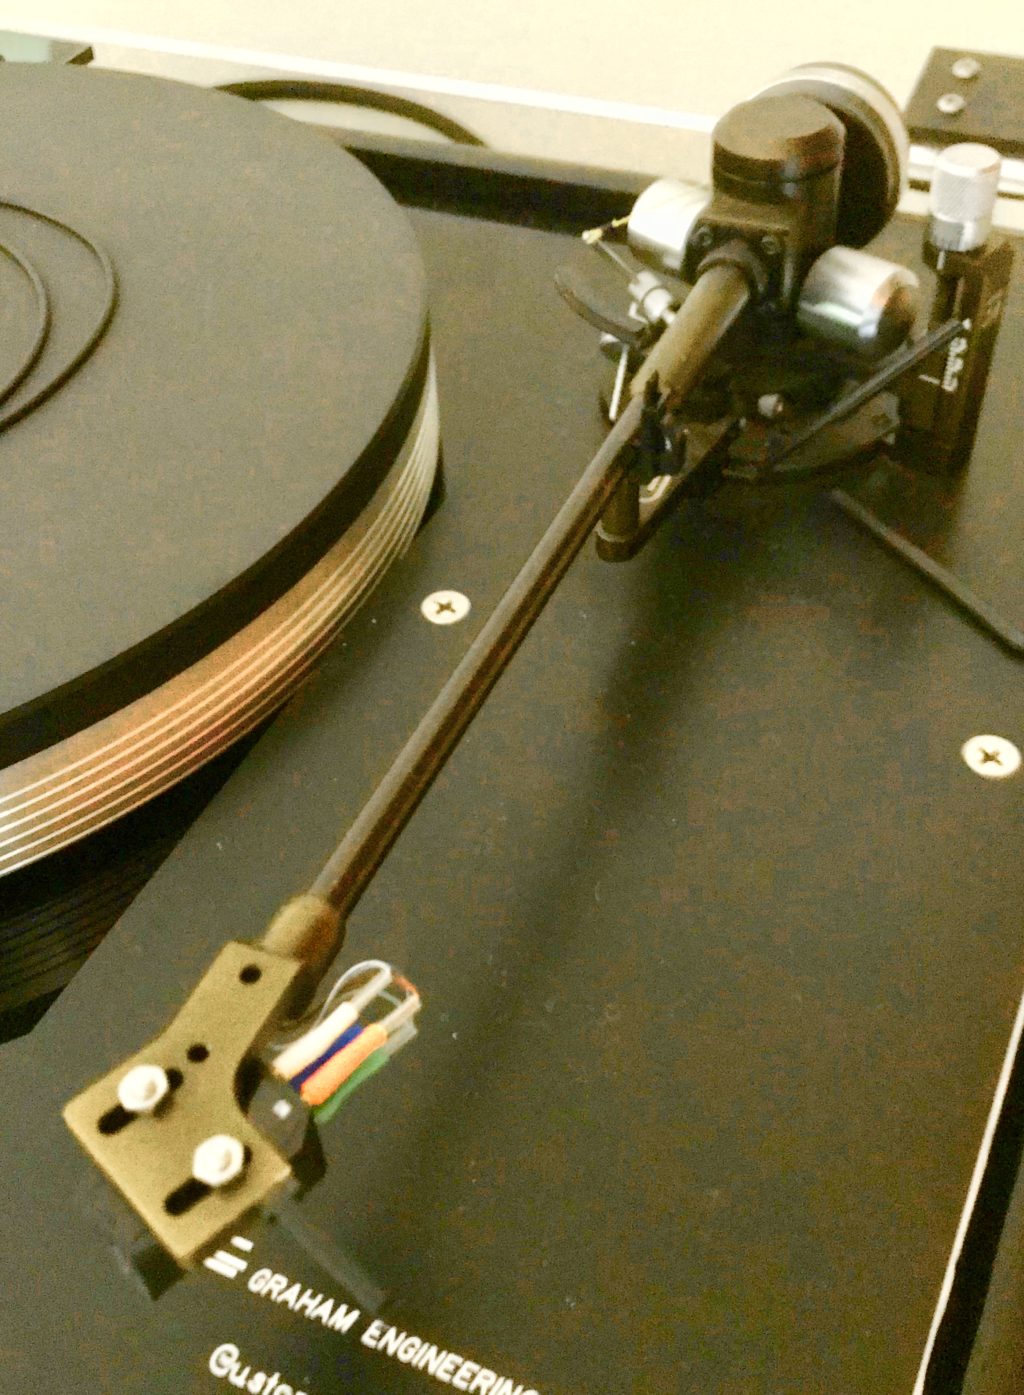
Mount the Cartridge
Start by just attaching the cartridge to your headshell and the tonearm wires to the attachment posts on the rear of the cartridge. Get it reasonably close to straight and then set the VTF.
Set vertical tracking force (VTF) or downforce
You’ll need a stylus force gauge for this. There are cheaper ones out there and ones that go up in price all the way to 400 bucks. I’d recommend getting one that measures to at least 1/100th of a gram.
Make sure you’ve disengaged the anti-skate device on your tonearm, if it has one (which is really should). The force of the anti-skate mechanism will add a little to the downforce your gauge measures, so the measurement will be more accurate if it’s not employed.
Once you have your stylus force gauge, check on what your cartridge manufacturer recommends for your cartridge’s downforce. It will typically be a range, such as 1.8 grams to 2.2 grams, or something similar. I would suggest starting with the middle of that range. Again, this is something that you can always come back to and change later.
*Note* If you’re using a Dynavector Karat 17dx, I recommend the lowest end of the range for recommended VTF, or 1.8g.
Leave the anti-skate “OFF” for now until you’ve set the cartridge overhang.
Set the cartridge overhang
This is by far the trickiest part of installing a cartridge on a tonearm and you may quickly find yourself relating to the sentiments expressed by the “Beginner’s Guide” article I referenced above. I’d suggest you don’t worry too much about getting your first install perfect. Just try getting it as close as you can without stressing yourself out too much.
I promise you this – even if your overhang setting is not perfect, as long as you use a decent protractor your records will still sound very good. You can always come back and revisit the overhang setting later if you want to get it even closer.
Start by stabilizing your platter. You might tape it in place with blue painters tape, or put some sort of wedge under the edge of the platter to keep it from turning. Then put the protractor on the platter and follow the instructions that come with the protractor you’ve chosen.
Typically, with an arc protractor, you’ll be adjusting the position of the protractor so the stylus is first on the arc nearer the outer edge of the platter. Then you’ll move the tonearm toward the spindle and see if the stylus is still sitting on the same arc closer to the spindle. If you’re incredibly lucky, it will land on the exact same arc, but more than likely it will land forward of it or behind it.
If it’s forward, it means you need to move the cartridge back in the headshell. If it’s behind, you need to move it forward. Those are the basics, but once again, refer to your protractor instructions for more details.
You can also reach out to me in the comments if you need some help.
Align Your Cantilever
Once you have the overhang set, lightly tighten one of the screws attaching the cartridge to the headshell and leave the other slightly little loose. Use the locations on the protractor that show you if your cartridge is perpendicular to the arc, and adjust it by eye so it is so at each of them (usually there are 2).
Then, use the line that runs under the stylus perpendicular to the arc at these locations and adjust the alignment of the cartridge so that the longer piece to which the stylus attaches, the cantilever, is exactly in line with these lines under the stylus. It is not unusual for the cantilever to be at a slightly different angle to this line than the cartridge body, so make sure to use the cantilever and not the cartridge body.
If you have a really hard time seeing the actual cantilever, DON’T SWEAT IT TOO MUCH! Just align the cartridge body with the lines perpendicular to the arc on your protractor and leave it at that.
Set the tonearm height
Take out a record that you won’t care if it gets scratched. It may not get scratched but there’s no reason to take any chances. Place your now installed cartridge / stylus on the record groove, somewhere within about half an inch, or so, from the outer groove. Now look at the tonearm from the side and make sure that it looks perfectly level to the record.
This is actually pretty important. You can get it very close by eye, which should be fine. If you want to be more accurate, I’d suggest this tool from Mobile Pro Shop. I don’t recommend using the protractor that comes with it, but this plexiglass block with printed lines on it can be set just behind your tonearm while it’s sitting on the record and you’ll be able to use the lines on it to see if your tonearm is exactly level to the record surface, or not.
Of course, this presumes you have the ability to adjust the height of your tonearm, which is not a feature on every tonearm. Hopefully you do, in which case adjust it accordingly. If you don’t, reach out to me in the comments for suggestions on what you can do to get your tonearm level.
Set the anti-skate
Follow your tonearm instructions for setting the anti-skate. If there are none, start with the lowest setting and see my instructions on setting anti-skate in my soon to be revised Turntable Setup Guide Part 2. There I’ll discuss ways to more accurately adjust your anti-skate so make sure to join my mailing list and you’ll be notified when the I post new articles, including Part 2.
At some point, you may also want to read some of the articles I’ve already posted on turntable setup. But first, I’d suggest enjoying the fruits of your labors and play some records. You can always dig deeper later.
Start playing records!
To begin playing records, the above is all you need to do. Once you start playing and listening to your records, you will have ample opportunity to fine-tune these adjustments. More detailed guidance and tips for fine-tuning these adjustments will be given in Part 2.